안녕하세요 건브로입니다.
오늘은 로그인 기능과 로그아웃 기능이 다 만들어지고,
그에 따른 화면들이 바뀌는 것 까지 만들어졌어요!
방학 끝나기 전까지는 여기서 배운 내용들을 머리에 넣고 싶네요.
파이팅!
1. Log In
전에 올린 개발 일기 게시물은 계정 생성만 되고, 화면이 따로 안 나왔었다.
하지만 이 코드들을 사용하고 나서부터는 화면이 따로 나온다.
그리고 로그인과 계정 생성이 토글 버튼 기능이 있어서 계정이 있으면 로그인이 가능하며,
없으면 계정 생성도 가능해졌다. 그리고 로그인하면 화면도 따로 표시가 된다.
1) App.js
첫 번째 코드 블록에는 init, setInit이 새로 생겼다.
init은 firebase가 초기화되어있는지 알려주는 boolean값이다.
그래서 처음에는 초기화가 안되어 있기에 authService.currentUser를 사용해도 null이 나온다.
firebase는 처음에 초기화하는데 시간이 걸린다. 시간이 걸리는 동안에는 "Initializing"이라는 문자열이 화면에
나온다. 그리고 최기화가 되면, 로그인 화면과 Home 화면으로 나눠진다.
이렇게 작동하는 이유는 내가 useEffect()를 사용해서 authService.onAuthStateChanged() 함수를 썼기 때문이다.
useEffect()는 생명주기를 관리하는 함수인데, 여기서는 ComponentDidMount기능만 있다.
결국, mount 되었을 때 authService.onAuthStateChanged() 함수를 사용한다.
이 함수는 로그인, 로그아웃, 초기화할 때 관찰자의 역할을 하는 함수이다.
아래의 링크는 onAuthStateChanged에 관한 문서 링크이다.
firebase.google.com/docs/reference/js/firebase.auth.Auth?hl=ko#onauthstatechanged
Auth | JavaScript SDK | Firebase
Reference for Auth
firebase.google.com
내가 크롬 개발자 도구에서 Application에서 user를 삭제하지 않다면, Home으로 바로 이동한다.
하지만 만약 삭제했다면, 로그인 화면이 나온다.
//App.js
import React, { useEffect, useState } from "react";
import AppRouter from "components/Router";
import {authService} from "myBase";
function App() {
//초기화가 됐는지 안됐는지 알려주는 state이다.
const [init, setInit] = useState(false);
// 로그인이 됐는지 안됐는지 알려주는 state이다.
const [isLoggedIn, setIsLoggedIn] = useState(false);
useEffect(()=>{
authService.onAuthStateChanged((user)=>{
if(user){
setIsLoggedIn(true);
}else {
setIsLoggedIn(false);
}
setInit(true);
})
},[])
return (
<>
{init ? <AppRouter isLoggedIn={isLoggedIn}/>: "Initializing..."}
<footer>© {new Date().getFullYear()} Nwitter</footer>
</>
);
}
export default App;
2) Auth.js
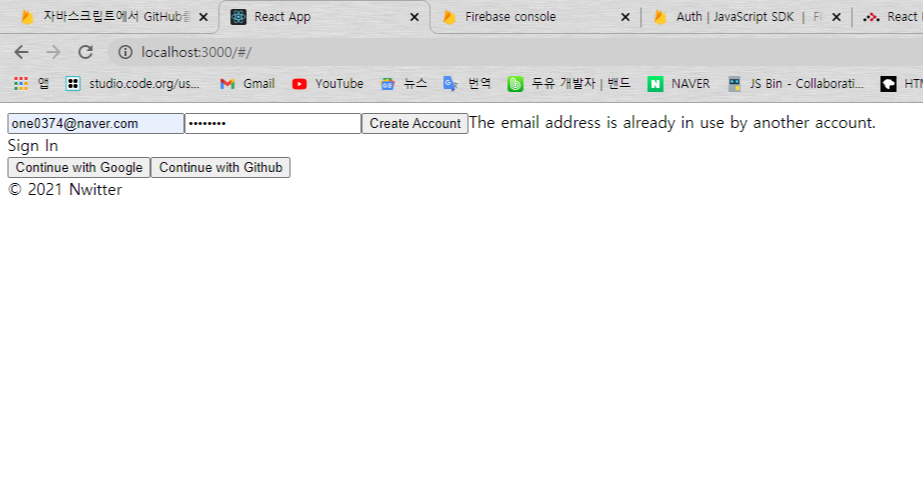
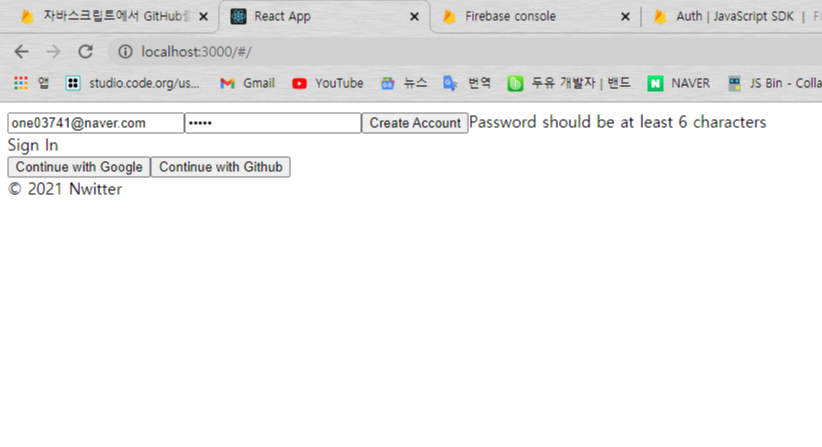
로그인 인증을 할 때 이미 만들어진 아이디로 가입한다면, 오류가 떠야 한다.
Auth.js에 추가된 코드가 바로 오류를 화면에 나오게 하는 코드이다.
원래 firebase에서는 authService.createUserWithEmailAndPassword() 함수를 사용하게 되면,
오류로 비밀번호 길이와 중복된 아이디에 대한 오류 등등이 있다.
에러가 나왔을 때 에러 객체의 key인 message를 이용해서 화면에 나오게 한다.
//Auth.js
import { authService } from "myBase";
import React, { useState } from "react";

const Auth = () => {
  const [email, setEmail] = useState("");
  const [password, setPassword] = useState("");
  const [newAccount, setNewAccount] = useState(true);
  const [error, setError] = useState("");
  const onChange = (event) => {
    const {
      target: { name, value },
    } = event;
    console.log(name);
    if (name === "email") {
      setEmail(value);
    } else if (name === "password") {
      setPassword(value);
    }
  };
  const onSubmit = async (event) => {
    event.preventDefault();
    try {
        let data;
      if (newAccount) {
        // create account
        data = await authService.createUserWithEmailAndPassword(
          email,
          password
        );
      } else {
        //log in
        data = await authService.signInWithEmailAndPassword(
          email,
          password
        );
      }
      console.log(data);
    } catch (error) {
      setError(error.message);
    }
  };
  const toggleAccount = () =>setNewAccount(prev => !prev);

  return (
    <div>
      <form onSubmit={onSubmit}>
        <input
          name="email"
          type="text"
          placeholder="Email"
          required
          value={email}
          onChange={onChange}
        />
        <input
          name="password"
          type="password"
          placeholder="Password"
          required
          value={password}
          onChange={onChange}
        />
        <input type="submit" value={newAccount ? "Create Account" : "Sign In"} />
        {error}
      </form>
      <span onClick = {toggleAccount}>{newAccount ? "Sign In": "Create Account"}</span>
      <div>
        <button>Continue with Google</button>
        <button>Continue with Github</button>
      </div>
    </div>
  );
};
export default Auth;
2. Social Log In
1) Auth.js
소주제를 보면 알 수 있듯이 소셜 로그인 서비스를 만드는 것이다.
Auth.js에서는 github와 google 로그인 서비스를 추가하는 코드가 추가됐다.
주석처리 한 부분은 신경 쓰지 말고 안 된 부분만 집중해서 보면 된다.
onSocialClick 함수는 github, google button에 연결하는 함수이다.
만약, google을 클릭하면 button의 이름을 인식하게 된다.
해당 이름과 google이랑 같다면 provider값에 들어간다.
authService.siginInWithPopup() 안에는 provider가 들어가고 google 계정으로 회원가입된다.
signInWithPopup()의 기능은 팝업 기반 OAuth 인증을 사용하여 Firebase 클라이언트를 인증한다.
firebase.google.com/docs/reference/js/firebase.auth.Auth?authuser=0#signinwithpopup
Auth | JavaScript SDK | Firebase
Reference for Auth
firebase.google.com
//Auth.js
import { authService, firebaseInstance } from "myBase";
import React, { useState } from "react";

const Auth = () => {
/*
  const [email, setEmail] = useState("");
  const [password, setPassword] = useState("");
  const [newAccount, setNewAccount] = useState(true);
  const [error, setError] = useState("");
  const onChange = (event) => {
    const {
      target: { name, value },
    } = event;
    console.log(name);
    if (name === "email") {
      setEmail(value);
    } else if (name === "password") {
      setPassword(value);
    }
  };
*/
/*  const onSubmit = async (event) => {
    event.preventDefault();
    try {
        let data;
      if (newAccount) {
        // create account
        data = await authService.createUserWithEmailAndPassword(
          email,
          password
        );
      } else {
        //log in
        data = await authService.signInWithEmailAndPassword(
          email,
          password
        );
      }
      console.log(data);
    } catch (error) {
      setError(error.message);
    }
  };
  */
  /*
  const toggleAccount = () =>setNewAccount(prev => !prev);
  */
  const onSocialClick = async(event) =>{
    const {target: {name}} = event;
    let provider;
    if(name ==="google"){
      provider = new firebaseInstance.auth.GoogleAuthProvider();
    }else if(name === "github"){
      provider = new firebaseInstance.auth.GithubAuthProvider();
    }
    const data =await authService.signInWithPopup(provider);
    console.log(data);

  }
  return (
    <div>
      <form onSubmit={onSubmit}>
        <input
          name="email"
          type="text"
          placeholder="Email"
          required
          value={email}
          onChange={onChange}
        />
        <input
          name="password"
          type="password"
          placeholder="Password"
          required
          value={password}
          onChange={onChange}
        />
        <input type="submit" value={newAccount ? "Create Account" : "Sign In"} />
        {error}
      </form>

      //여기서부터 추가됨
      <span onClick = {toggleAccount}>{newAccount ? "Sign In": "Create Account"}</span>
      <div>
        <button name="google" onClick={onSocialClick}>Continue with Google</button>
        <button name="github" onClick={onSocialClick}>Continue with Github</button>
      </div>
    </div>
  );
};
export default Auth;
3. Log Out
여태까지 만들었던 코드들은 로그아웃 기능이 없었다.
오로지 개발자 도구의 application에서 user 정보를 강제적으로 없애야 했다.
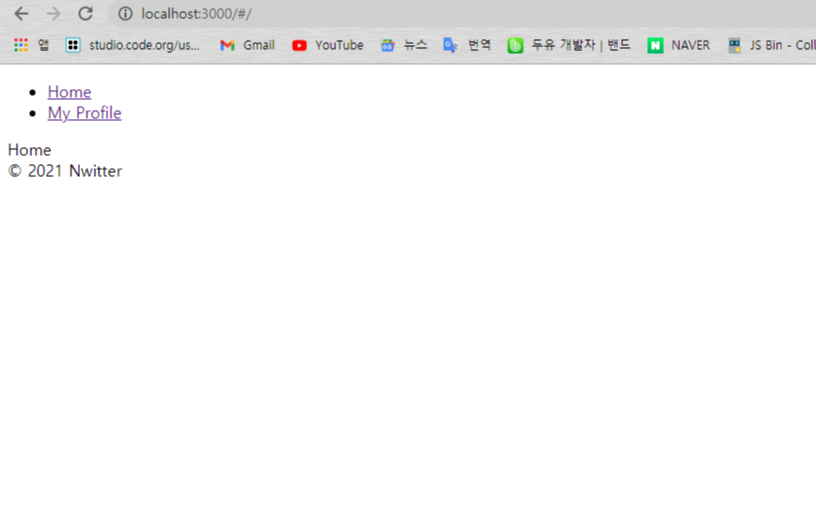
그리고 내비게이션 또한 추가됐다.
1) Navigation.js
아래의 코드는 내비게이션 코드로 Router.js의 자식 컴포넌트이다.
//Nevigation.js

import React from "react";
import { Link } from "react-router-dom";

const Navigation = () => {
  return (
    <nav>
      <ul>
        <li>
          <Link to="/">Home</Link>
        </li>
        <li>
          <Link to="/profile">My Profile</Link>
        </li>
      </ul>
    </nav>
  );
};
export default Navigation;
2) Router.js
Navigation 컴포넌트는 로그인되어야 Navigation이 보인다.
그래서 isLoggedIn이 true일 때만 Navigation이 보인다.
나는 내 동네 친구들과 사진을 공유하는 웹 페이지를 만들고 있었는데,
이 코드를 보니 내 코드는 너무 React를 나눠서 사용하지 않았다는 생각이 들었다.
좀 더 효과적이고, 복잡하지 않게 만들려면 컴포넌트들을 잘 활용해야 하고,
3항 연산자와 논리 연산자를 잘 사용할 줄 알아야 한다.
난 아직 그 부분이 부족하다.🤦♂️
니꼬쌤 강의를 모두 끝내면 전체적으로 혼자서 코드를 효과적으로 짜는 연습을 해야겠다.
//Router.js

import React from "react";
import {
  HashRouter as Router,
  Redirect,
  Route,
  Switch,
} from "react-router-dom";
import Auth from "routes/Auth";
import Home from "routes/Home";
import Navigation from "components/Navigation";
import Profile from "routes/Profile";

const AppRouter = ({ isLoggedIn }) => {
  return (
    <Router>
      {isLoggedIn && <Navigation />}
      <Switch>
      {isLoggedIn ? (
        <>
          <Route exact path="/">
            <Home />
          </Route>
          <Route exact path="/profile">
            <Profile />
          </Route>
          <Redirect from="*" to="/" />
        </>
      ) : (
        <>
          <Route exact path="/">
            <Auth />
          </Route>
          <Redirect from="*" to="/" />
        </>
      )}
      </Switch>
    </Router>
  );
};

export default AppRouter;
3) Auth.js
달라진 건 없고 그냥 쭉 보면서 확인하면 된다.
//Auth.js

import { authService, firebaseInstance } from "myBase";
import React, { useState } from "react";

const Auth = () => {
  const [email, setEmail] = useState("");
  const [password, setPassword] = useState("");
  const [newAccount, setNewAccount] = useState(true);
  const [error, setError] = useState("");
  const onChange = (event) => {
    const {
      target: { name, value },
    } = event;
    console.log(name);
    if (name === "email") {
      setEmail(value);
    } else if (name === "password") {
      setPassword(value);
    }
  };
  const onSubmit = async (event) => {
    event.preventDefault();
    try {
      let data;
      if (newAccount) {
        // create account
        data = await authService.createUserWithEmailAndPassword(
          email,
          password
        );
      } else {
        //log in
        data = await authService.signInWithEmailAndPassword(email, password);
      }
      console.log(data);
    } catch (error) {
      setError(error.message);
    }
  };
  const toggleAccount = () => setNewAccount((prev) => !prev);
  const onSocialClick = async (event) => {
    const {
      target: { name },
    } = event;
    let provider;
    if (name === "google") {
      provider = new firebaseInstance.auth.GoogleAuthProvider();
    } else if (name === "github") {
      provider = new firebaseInstance.auth.GithubAuthProvider();
    }
    const data = await authService.signInWithPopup(provider);
    console.log(data);
  };
  return (
    <div>
      <form onSubmit={onSubmit}>
        <input
          name="email"
          type="text"
          placeholder="Email"
          required
          value={email}
          onChange={onChange}
        />
        <input
          name="password"
          type="password"
          placeholder="Password"
          required
          value={password}
          onChange={onChange}
          autoComplete="off"
        />
        <input
          type="submit"
          value={newAccount ? "Create Account" : "Sign In"}
        />
        {error}
      </form>
      <span onClick={toggleAccount}>
        {newAccount ? "Sign In" : "Create Account"}
      </span>
      <div>
        <button name="google" onClick={onSocialClick}>
          Continue with Google
        </button>
        <button name="github" onClick={onSocialClick}>
          Continue with Github
        </button>
      </div>
    </div>
  );
};
export default Auth;
4) Profile.js
Profile.js는 로그아웃 기능이 있다.
로그아웃 기능은 authService.signOut(); 함수만 사용하면 끝난다.
대신 로그아웃을 하더라도 url 값은 바뀌지 않기에 이상해(?) 진다.
그래서 그럴 때는 reactrouter.com/web/api/Redirect
React Router: Declarative Routing for React
Learn once, Route Anywhere
reactrouter.com
이 링크에서 찾아보면 된다.
Router.js에서<Redirect/> 태그를 사용해도 되고, 아니면 Profile.js에서 국한적으로 사용하고 싶다면
useHistory를 사용해도 좋다.
//Profile.js

import { authService } from "myBase";
import React from "react";
import { useHistory } from "react-router-dom";
const Profile = (props) => {
  const history = useHistory();
  const onLogOutClick = () => {
    authService.signOut();
    history.push("/");
  };
  console.log(props);
  return (
    <>
      <button onClick={onLogOutClick}>Log Out</button>
    </>
  );
};
export default Profile;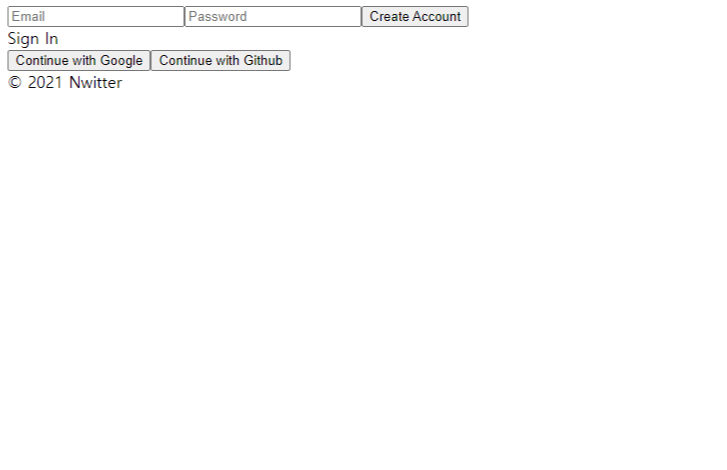

오늘은 여기까지!😊😊
'개발 일기' 카테고리의 다른 글
| [개발 일기] Feeding Plants 만들기 #2 (0) | 2021.02.17 |
|---|---|
| [개발 일기] Feeding Plants 만들기 #1 (0) | 2021.02.15 |
| [개발 일기] 트위터 클론 코딩 #2 by 니꼬쌤 (0) | 2021.02.10 |
| [개발 일기] 트위터 클론 코딩 #1 by 니꼬쌤 (0) | 2021.02.08 |
| [개발 일기] React.js와 Node.js 이용하기 시작 #2 by 나동빈님(프론트엔드와 서버 폴더 세팅) (1) | 2021.01.18 |