오늘은 Redux에 대해서 정리를 해보려고 합니다.
저는 Redux는 React를 배우고 나서 계속 듣긴 했지만,
제대로 공부를 한 적이 없었습니다.
왜냐하면, React를 깊게 공부한 게 아니어서 '클래스형이나 함수형 컴포넌트의
state 관리 기능으로만 페이지를 만들자!'라는 마인드였습니다.
하지만, 지금은 공모전에 나가야 할 상황도 있고, 실생활에서 쓰려면 위에서 아래로 떨어지는
React state 관리 방법을 벗어나야 할 필요를 느꼈습니다.
그럼 Redux는 뭘까요?
그리고 여기서는 주로 React와 연관 지어서 설명합니다😊
0. 사전 준비
react에서 사용하기 때문에 'yarn add redux' or 'npm i redux',
'yarn add react-redux' or 'npm i react-redux'로 패키지를 다운로드하셔야 합니다.
1. Redux 란
Redux는 간단하게 말하자면, 전역적으로 상태를 관리해주는 라이브러리입니다.
그리고 신기하게도 React에만 종속된 게 아닌 다른 라이브러리에서도 사용 가능합니다.
Redux는 폴더상으로는 어느 한 군데에 뭉쳐 저 있고, import와 export만 제대로
해놓는다면 언제 어디서든 불러서 쓸 수 있습니다.
2. Redux 상태 관리 흐름
React는 컴포넌트를 사용하여, 부모와 자식이 있는 트리 구조입니다.
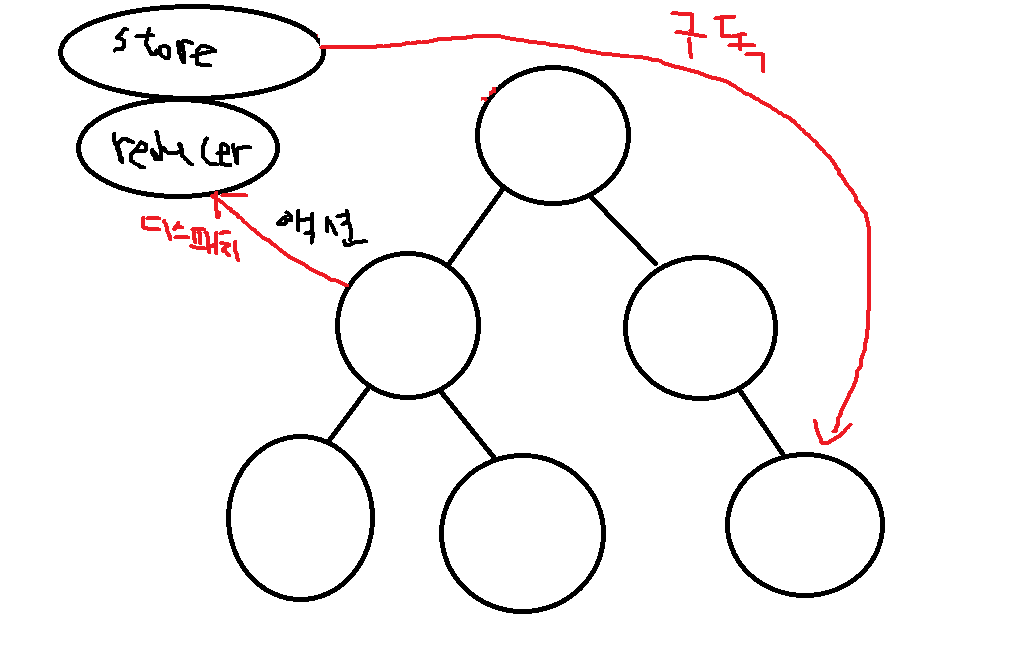
위 그림을 간단하게 보면 부모와 자식 간의 state 변화가 아닌
부모의 자식들 간의 state 변화에 영향을 주고 싶을 때입니다.
먼저 액션을 어느 한 컴포넌트에서 액션을 주면, 디스패치를 통해서 reducer로 갑니다.
그리고 reducer에서 state 값이 수정됩니다.
그 후에는 바뀐 state 값은 Store 안에 들어갑니다.
구독하고 있는 컴포넌트에는 새로운 데이터로 받을 수 있습니다.
바뀐 데이터를 바로 받을 수 있는 이유는 props로 받기 때문입니다.
3. Redux의 핵심 용어
- State : 리덕스에서 저장하고 있는 상태 값(딕셔너리 형태)
- Action: type과 data로 이루어진 객체, type은 개인이 만들어주는 뜻이 있는 이름
- ActionCreator: 액션 생성 함수
- Reducer: 리덕스에 저장된 state를 변경하는 함수
- Store: reducer, state, 리덕스에서 값을 가져오고
액션을 호출하기 위한 몇 가지 내장 함수가 포함
생김새는 json처럼 생김
- dispatch: 스토어의 내장 함수이며, 액션을 발생시키는 역할
즉, reducer로 전달시켜주는 역할을 한다는 것
4. Redux의 특징
Redux에는 3가지 특징이 있습니다.
1) Store는 무조건 한 개만 써야 합니다. 그리고 한 프로젝트 당 한 개밖에 안됩니다.
2) Store의 state는 action으로만 변경할 수 있습니다.
3) reducer의 블록(중괄호) 안에서는 전역 변수나 전역 함수에 영향을 받지 않는 순수 함수입니다.
5. Redux 폴더 구조: ducks구조
react에서 redux의 폴더 구조는 어떻게 될까요?
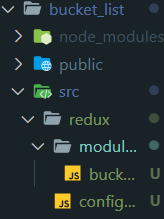
redux를 사용하는 폴더 구조는 여러 가지(?) 있겠지만,
ducks구조가 있습니다.
원래 redux를 사용할 때는 reducer는 reducer 끼리 action는 action끼리 묶는다고들 합니다.
하지만, 우리가 사용하려는 ducks구조는 같은 기능을 하는 파일을 모아둔 구조입니다.
먼저, modules 폴더 안에 있고, 같은 기능끼리 있는 bucket.js를 살펴보겠습니다.
//bucket.js

//export 변수로만 보내면, 받는 쪽에서는 import {변수} from './경로~~'로 받는다.
//export default 변수로 보내면, 받는 쪽에서는 import 변수 from './경로'로 받는다.
//export default는 한 파일에 하나 밖에 못씀
// Actions
const LOAD = "bucket/LOAD";
const CREATE = "bucket/CREATE";
const DELETE = "bucket/DELETE";

const initialState = {
	list: ['영화관 가기', '매일 책읽기', '수영 배우기']
};

//Action Creators
//loadBucket의 파라미터로는 bucket은 사실 필요없지만, 형식상 맞춤
//이유: 들어올 데이터가 없고, 보내줘야하는 데이터만 있기 때문
export const loadBucket = (bucket) =>{
	return {type: LOAD, bucket};
}

export const createBucket = (bucket) =>{
	return {type: CREATE, bucket};
}

export const deleteBucket = (bucket) =>{
	return {type: DELETE, bucket};
}
//Reducer
//state는 현재 store에서 가지고 있는 데이터
//action는 dispatch를 통해 들어오는 외부 데이터
export default function reducer(state = initialState, action){
	switch(action.type){
    	case "bucket/LOAD":
        	return state;
        case "bucket/CREATE":
            const new_bucket_list = [...state.list, action.bucket];
            return {list: new_bucket_list};
        case "bucket/DELETE":
            const bucket_list = state.list.filter((l, idx) => {
              if(idx !== action.bucket){
                  return l;
              }
            });
            return {list: bucket_list};

    default:
      return state;
    }
}
위와 같이 bucket.js에는 reducer, action, actionCreator 모든 게 모여있습니다.
하지만, store는 빠져있습니다.
store는 redux폴더 바로 밑에 configStore.js에 있습니다.
//configStore.js
import {createStore, combineReducers} from 'redux';
import bucket from './modules/bucket';
import {createBrowserHistory} from 'history';

export const history = createBrowserHistory();
//combineReducers는 여러 개 있는 reducers를 합쳐주는 역할
const rootReducer = combineReducers({bucket});
//store 생성
const store = createStore(rootReducer);

export default store;
일단 여기까지가 순수 리덕스에 대한 세팅이었습니다.
이제부터는 react와 redux를 연결하는 코드를 살펴보겠습니다.
//index.js
import React from 'react';
import ReactDOM from 'react-dom';
import App from './App';
import {BrowserRouter} from 'react-router-dom';

import {Provider} from 'react-redux';
import store from './redux/configStore';
//Provider 태그에 store 주입
ReactDOM.render(
  <Provider store={store}>
    <BrowserRouter>
      <App />
    </BrowserRouter>
  </Provider>,
  document.getElementById('root')
);
//App.js
import React from "react";

import { withRouter } from "react-router";
import { Route, Switch } from "react-router-dom";

// import [컴포넌트 명] from [컴포넌트가 있는 파일경로];
import BucketList from "./BucketList";
import styled from "styled-components";
import Detail from "./Detail";
import NotFound from "./NotFound";

// 리덕스 스토어와 연결하기 위해 connect라는 친구를 호출할게요!
import {connect} from 'react-redux';
// 리덕스 모듈에서 (bucket 모듈에서) 액션 생성 함수 두개를 가져올게요!
import {loadBucket, createBucket} from './redux/modules/bucket';

// 이 함수는 스토어가 가진 상태값을 props로 받아오기 위한 함수예요.
const mapStateToProps = (state) => ({
  bucket_list: state.bucket.list,
});

// 이 함수는 값을 변화시키기 위한 액션 생성 함수를 props로 받아오기 위한 함수예요.
const mapDispatchToProps = (dispatch) => ({
  load: () => {
    dispatch(loadBucket());
  },
  create: (new_item) => {
    dispatch(createBucket(new_item));
  }
});

class App extends React.Component {
  constructor(props) {
    super(props);
    this.state = {

    };
    // 클래스 형 컴포넌트의 ref 사용
    this.text = React.createRef();
  }

  componentDidMount() {
    console.log(this.props);
  }

  addBucketList = () => {
    const new_item = this.text.current.value;
    this.props.create(new_item);
  };


  render() {
    return (
      <div className="App">
        <Container>
          <Title>내 버킷리스트</Title>
          <Line />

          <Switch>
            <Route path="/" exact component={BucketList} />
            <Route path="/detail/:index" component={Detail} />
            <Route component={NotFound} />
          </Switch>
        </Container>

        <Input>
          <input type="text" ref={this.text} />
          <button onClick={this.addBucketList}>추가하기</button>
        </Input>
      </div>
    );
  }
}

const Input = styled.div`
  max-width: 350px;
  min-height: 10vh;
  background-color: #fff;
  padding: 16px;
  margin: 20px auto;
  border-radius: 5px;
  border: 1px solid #ddd;
`;

const Container = styled.div`
  max-width: 350px;
  min-height: 60vh;
  background-color: #fff;
  padding: 16px;
  margin: 20px auto;
  border-radius: 5px;
  border: 1px solid #ddd;
`;

const Title = styled.h1`
  color: slateblue;
  text-align: center;
`;

const Line = styled.hr`
  margin: 16px 0px;
  border: 1px dotted #ddd;
`;
// withRouter 적용
// connect로 묶어줬습니다!
export default connect(mapStateToProps, mapDispatchToProps)(withRouter(App));
이 코드는 클래스 형 컴포넌트가 적용되어 있는 App.js입니다.
클래스 형 컴포넌트에서는 connect라는 함수가 필요합니다.
왜 connect 함수가 필요하냐면, props에 redux의 state나 redux의 액션 생성 함수를 넘겨주기 위함입니다.
클래스형 컴포넌트는 props에 state, actionCreator함수를 넣는 게 함수형 컴포넌트보다 복잡합니다.
이번엔 함수형 컴포넌트인 BucketList.js와 Detail.js를 살펴볼게요.
// BucketList.js

// 리액트 패키지를 불러옵니다.
import React from "react";
import styled from "styled-components";

// redux hook을 불러옵니다.
import {useDispatch, useSelector} from 'react-redux';

const BucketList = (props) => {
  // 버킷리스트를 리덕스 훅으로 가져오기
  const bucket_list = useSelector(state => state.bucket.list);

  console.log(bucket_list);

  return (
    <ListStyle>
      {bucket_list.map((list, index) => {
        return (
          <ItemStyle
            className="list_item"
            key={index}
            onClick={() => {
              // 배열의 몇번째 항목을 눌렀는 지, url 파라미터로 넘겨줍니다.
              props.history.push("/detail/"+index);
            }}
          >
            {list}
          </ItemStyle>
        );
      })}
    </ListStyle>
  );
};

const ListStyle = styled.div`
  display: flex;
  flex-direction: column;
  height: 100%;
  overflow-x: hidden;
  overflow-y: auto;
`;

const ItemStyle = styled.div`
  padding: 16px;
  margin: 8px;
  background-color: aliceblue;
`;

export default BucketList;
// 리액트 패키지를 불러옵니다.
import React from "react";

// redux hook을 불러옵니다.
import { useDispatch, useSelector } from "react-redux";
// 내가 만든 액션 생성 함수를 불러옵니다.
import {deleteBucket} from "./redux/modules/bucket";

const Detail = (props) => {
    const dispatch = useDispatch();


  // 스토어에서 상태값 가져오기
  const bucket_list = useSelector((state) => state.bucket.list);
  // url 파라미터에서 인덱스 가져오기
  let bucket_index = parseInt(props.match.params.index);

  return (
    <div>
      <h1>{bucket_list[bucket_index]}</h1>
      <button onClick={() => {
        dispatch(deleteBucket(bucket_index));
      }}>삭제하기</button>
    </div>
  );
};

export default Detail;
함수형 컴포넌트에서는 그냥 useSelector과 useDispatch만 사용하면 끝납니다.
클래스형 컴포넌트와 비교한다면, connect함수 + mapStateToProps함수 = useSelector함수인 것 같고,
connect함수 + mapDispatchToProp함수 = useDispatch함수인 것 같네요.
다만 useSelector는 props로 state를 주입하지는 않으니 그냥 외우기 쉽게 단순하게 외우는 게 좋습니다.(useDispatch도 마찬가지)
여기서 결론적으로 우리가 얻을 수 있는 것은 store의 데이터를 바꾸려면 reducer를 통해서 바꿔야 하는데, reducer의 action만이 바꿀 수 있습니다.
그리고 action을 발생시키는 actionCreator 함수를 dispatch 함수에 넣고 reducer에 보낼 수 있습니다.
뭔가... dispatch는 장약이고, actionCreator는 자주포나 견인포이며, action는 포탄 느낌인 것 같네요.
즉, 포탄(action)을 보내는 견인포(actionCreator)에는 장약(dispatch)이 있어야 하며, 목표물(redcuer)에 맞춰야 적(store)한테는 변화가 생긴다고 저는 이해하겠습니다.
저는 이만~