안녕하세요! 건브로입니다.

1주차 때는 화면에 Hello World 나오게 해보자! 그런 느낌이었는데,
와우 이번주는 그냥 자기가 표현하고 싶은 것들을 코딩할 수 있는 느낌이었어요.
그래서 이번주 개발 일기는 제가 표현한 걸 그대로 써서 배웠던 부분을 한 번더 느껴보겠습니다.
1. 코드
<App.js>
import React from "react";
// import './App.css';
import Starter from "./Starter";
import Score from "./Score";
import heize from "./images.jpg";
import styled from "styled-components";
import Quiz from "./Quiz";
import SwipeItem from "./SwipeItem";

class App extends React.Component {
  constructor(props) {
    super(props);
    this.state = {
      friend: "헤이즈",
      image: heize,
      page: ["starter", "quiz", "swipeitem", "score"],
      quizList: [
        { question: "헤이즈가 좋아하는 음식은 떡볶이다.", answer: "O" },
        { question: "헤이즈의 나이는 30살이다.", answer: "X" },
        { question: "헤이즈는 부경대학교에 다녔었다.", answer: "O" },
        { question: "헤이즈는 자매가 있다.", answer: "X" },
      ],
      count: 0,
    };
  }

  movePreviousPage = () => {
    let current_count = this.state.count;
    let current_page = this.state.page[current_count];
    if (current_page === "starter") {
      alert("전 페이지가 없습니다!");
    } else {
      this.setState({ count: current_count - 1 });
    }
  };

  moveNextPage = () => {
    let current_count = this.state.count;
    let current_page = this.state.page[current_count];
    if (current_page === "score") {
      alert("마지막 페이지입니다!");
    } else {
      this.setState({ count: current_count + 1 });
    }
  };

  render() {
    const current_count = this.state.count;
    const current_page = this.state.page[current_count];
    const quiz_count = current_count - 1;
    return (
      <div className="app">
        <Container>
          {current_page === "starter" && (
            <Starter name={this.state.friend} image={this.state.image} />
          )}
          {current_page === "quiz" && (
            <Quiz
              quiz={this.state.quizList[quiz_count].question}
              count={this.state.count}
              page={this.state.page}
            />
          )}
          {current_page === "swipeitem" &&(
            <SwipeItem
              quizList={this.state.quizList}
              count={this.state.count}
              page={this.state.page}
              image={this.state.image}
            />
          )}
          {current_page === "score" && <Score name={this.state.friend} />}
        </Container>
        <ButtonContainer>
          <Button onClick={this.movePreviousPage}>뒤로</Button>
          <Button onClick={this.moveNextPage}>다음</Button>
        </ButtonContainer>
      </div>
    );
  }
}

const Container = styled.div`
  width: 100vw;
  margin: 0 auto;
  height: 80vh;
  border: 1px solid lightgray;
  border-top: none;
`;
const Button = styled.button`
  background-color: rgb(47, 110, 247);
  border: none;
  color: white;
  width: 150px;
  padding: 10px 20px;
  border-radius: 30px;
  margin: 0 1rem;
  z-index:1;
  &:active {
    background: rgb(47, 80, 247);
  }
`;
const ButtonContainer = styled.div`
  margin-top: 1rem;
  display: flex;
  justify-content: center;
`;
export default App;
<Starter.js>
import React from 'react';
import styled from "styled-components";
const Starter = ({name, image})=>{
  return(
    <>
      <Header>시작하기</Header>
      <Container>
        <img src={image} alt={name}/>
        <Question>나는 <span>{name}</span>에 대해서 얼마나 알고 있을까?</Question>
        <Input type="text" placeholder="내 이름" />
        <Button type="button">시작하기</Button>
      </Container>
    </>
  )
}
const Header = styled.header`
  background-color: lightgray;
  padding: 3px;
  font-weight: 700;
  color: gray;
`;

const Container = styled.div`
  display: flex;
  flex-direction: column;
  text-align: center;
  padding: 50px;
  align-items: center;
  &>img{
    width: 150px;
    margin-bottom: 20px;
  }
`;


const Button = styled.button`
  background-color: rgb(47, 110, 247);
  border: none;
  color: white;
  width: 150px;
  padding: 10px 20px;
  border-radius: 30px;
  &:active{
    background: rgb(47, 80, 247);
  }
`;

const Input = styled.input`
  background-color: rgb(236, 236, 236);
  padding: 10px 20px;
  border-radius: 30px;
  border: none;
  margin-bottom: 30px;
  width: 250px;
  outline:none;
`;

const Question = styled.p`
  font-size: 20px;
  line-height: 200%;
  margin-bottom: 50px;
  &>span{
    display: inline-block;
    border: none ;
    background-color: orange;
    padding: 3px 10px;
    border-radius: 40px;
    font-weight: 700;
  }
`

export default Starter;
<Quiz.js>
import React from "react";
import styled from "styled-components";

const Quiz = ({ quiz, count, page}) => {
  return (
    <>
      <Header>문제풀기</Header>
      <Container>
      <Bar>
        <Quntity count={count} pageNumber={page.length}><div></div></Quntity>
      </Bar>
        <Content>
          <Image src="https://img7.yna.co.kr/etc/inner/KR/2019/10/11/AKR20191011163900005_02_i_P4.jpg" alt={count}/>
          <Question>
            <p><span>{count}</span>번째 문제</p>
            <p>{quiz}</p>
          </Question>
          <ButtonContainer>
            <PositiveButton type="button">O</PositiveButton>
            <NegativeButton type="button">X</NegativeButton>
          </ButtonContainer>
        </Content>
      </Container>
    </>
  );
};

const Container = styled.div`
  margin:1rem;
`;

const Header = styled.header`
  background-color: lightgray;
  padding: 3px;
  font-weight: 700;
  color: gray;
`;

const Bar = styled.div`
  width: 100%;
  height: 2rem;
  background-color: #eee;
  border-radius: 20px;
`;
const Quntity = styled.div`
  width: ${({count, pageNumber})=> count/(pageNumber-2)*100}%;
  height: 100%;
  background-color: rgb(47, 110, 247);
  border-radius: 20px;
  padding: 4px;
  &>div{
    width:80%;
    background-color: rgb(255, 255, 255, 0.5);
    height: 6px;
    border-radius: 20px;
    margin: 0 auto;
  }
`;

const Content = styled.div`
  width: 70%;
  display: flex;
  flex-direction: column;
  text-align: center;
  align-items: center;
  margin: 0 auto;
  margin-top: 3rem;
  border: none;
  border-radius: 30px;
  overflow: hidden;
  box-shadow: 1px 1px 3px #aaa;
`;

const Image = styled.img`
  display:block;
  width: 100%;
`

const Question = styled.div`
  font-size: 20px;
  line-height: 300%;
  margin-bottom: 50px;
  font-size: 1rem;
  font-weight: 700;
  &>p>span{
    font-weight: 800;
    font-size: 2rem;
  }
`;
const ButtonContainer = styled.div`
  display: flex;
`;

const PositiveButton = styled.button`
  background-color: rgb(47, 110, 247);
  color: white;
  border: none;
  width: 100px;
  padding: 10px 20px;
  border-radius: 30px;
  margin: 0.5rem;
  &:active{
    background: rgb(47, 80, 247);
  }
`;

const NegativeButton = styled.button`
  background-color: white;
  font-weight: 700;
  color: rgb(47, 110, 247);
  border: none;
  width: 100px;
  padding: 10px 20px;
  border-radius: 30px;
  box-shadow: 1px 1px 5px gray;
  margin: 0.5rem;
  &:active{
    background: #eee;
  }

`;

export default Quiz;
<SwipeItem.js>
import React, { createRef, useEffect, useState } from "react";
import styled from "styled-components";
import TinderCard from 'react-tinder-card';

//import DirectSwipeItem from "./DirectSwipeItem";
const SwipeItem = ({quizList , count, page, image}) =>{

  const [swipeCount, setSwipeCount] = useState(1);
  useEffect(() => {
    if(swipeCount>=4){
      alert('끝났어요!');
    }
  },[swipeCount]);

  const onSwipe = (direction) => {
    console.log('You swiped: ' + direction);
    setSwipeCount(swipeCount+1);
  }
  return(
    <>
      <Header>문제풀기</Header>
      <Container>
        <Bar>
          <Quntity count={count} pageNumber={page.length}><div></div></Quntity>
        </Bar>
        <Content>
          {quizList.map((quiz, i)=>{
            if(i>=1 && i === swipeCount){
              return(
                <Question key={i}>
                  <p><span>{i+1}</span>번째 문제</p>
                  <p>{quiz.question}</p>
                </Question>
              )
            }
          })}
        </Content>
        <SwipeContainer>
          <QuizBoX>
            O
          </QuizBoX>
          <QuizBoX>
             X
          </QuizBoX>
          { quizList.map((quiz, i)=>{
            if(i>=1 &&i === swipeCount){
              return(
                 <DragItem key={i}>
                   <TinderCard onSwipe={onSwipe}>
                     <Image src={image}/>
                   </TinderCard>
                 </DragItem>
                // <DirectSwipeItem key={i} onSwipe={onSwipe}/>
              )
            }
          })}
        </SwipeContainer>
      </Container>
    </>
  );
}

const Container = styled.div`
  margin:1rem;
  overflow: hidden;
`;

const Header = styled.header`
  background-color: lightgray;
  padding: 3px;
  font-weight: 700;
  color: gray;
`;

const Bar = styled.div`
  width: 100%;
  height: 2rem;
  background-color: #eee;
  border-radius: 20px;
`;
const Quntity = styled.div`
  width: ${({count, pageNumber})=> count/(pageNumber-2)*100}%;
  height: 100%;
  background-color: rgb(47, 110, 247);
  border-radius: 20px;
  padding: 4px;
  &>div{
    width:80%;
    background-color: rgb(255, 255, 255, 0.5);
    height: 6px;
    border-radius: 20px;
    margin: 0 auto;
  }
`;

const Content = styled.div`
  display: flex;
  flex-direction: column;
  text-align: center;
  align-items: center;
  margin-top: 2rem;
  border: none;
  border-radius: 30px;
  overflow: hidden;
  box-shadow: 1px 1px 3px #aaa;
  height: 150px;
`;
const Question = styled.div`
  font-size: 20px;
  line-height: 300%;
  margin-bottom: 50px;
  font-size: 1.3rem;
  font-weight: 700;
  &>p>span{
    font-weight: 800;
    font-size: 2rem;
  }
`;
const SwipeContainer = styled.div`
  text-align:center;
`;
const QuizBoX = styled.span`
    display: inline-block;
    font-size: 200px;
    color: #aaa;
    width:50%;
`;

const DragItem = styled.div`
  display: flex;
  align-items: center;
  justify-content: center;
  position: fixed;
  top: 0;
  left: 0;
  width: 100vw;
  height: 100vh;
  & > div {
    border-radius: 500px;
    background-color: #ffd6aa;
    overflow:hidden;
  }
`;
const Image = styled.img`
  width: 9rem;
  height: 9rem;
`;

export default SwipeItem;
코드가 너무 길어서 Score.js는 뺐다.
아래의 영상들은 내가 만든 작품이다!
동영상 중 한 개는 react-tinder-card라는 라이브러리를 이용했고,
나머지 하나의 영상은 라이브러리 없이 만든 DirectSwipeItem.js가 적용됐다.
컴포넌트들을 블럭처럼 쌓다보니 이런 결과물들이 나왔는데,
애니메이션 작업과 touch이벤트가 제일 어려웠던 것 같다.
내가 디자인감각이 없어서 그런가..?
이렇게 만들 수 있었던 중요한 개념들 얘기 해봐야겠다.
2. SCSS와 styled-components
SCSS는 기존의 CSS를 유지한 채로 몇몇 문법을 추가한 버전이라고 생각한다.
물론 CSS에서 바로 발전한게 아니라 SASS의 세번째 업데이트에서 SCSS가 탄생됐다.
SCSS를 쓰는 이유는 CSS와의 호환성 때문에 사용한다고 한다. 그래서 SASS보다 SCSS를 더 사용한다.
일단 '파일.scss'형식으로 써보고 싶다면 npm으로 여러 페키지들을 다운로드 해야한다.
yarn add node-sass@4.14.1 open-color sass-loader classnames
이렇게 명령어 입력해서 다운로드 하면 우리는 scss확장자를 써도 오류가 안나온다.
이 패키지들을 처음 알았을 때 각자 어떤 기능을 하는 지 궁금했다.
node-sass는 node.js 환경에서 sass 컴파일이 가능하게 해준다.
하지만 지금은 Dart Sass로 재구현 됐다고한다!
node-sass는 최대한 안 사용하는 게 좋겠다.
sass-loader는 Sass/SCSS 파일을 로드하고 CSS로 컴파일 해준다.
sass-loader는 node-sass나 Dart sass가 필요하다.
classnames는 어떤 태그에 붙어 있는 class를 boolean 값에 따라 존재하게 할 수도 있고, 없앨 수도 있다.
open-color는 색깔을 세세하게 조작할 수 있는 패키지였다.
open-color는 이런 느낌으로 사용할 수 있다.
body{
	background-color: $oc-gray-1
}
//밝은 회색
<간단한 scss 문법>
만약, body안에 div태그가 있다고 가정하면 SCSS를 아래와 같이 쓸 수 있다.
$bgcolor: green;

body{
    background-color: #{$bgcolor};
    &:hover{
    	background-color: #fff;
    }
    &>div{
    	background-color: #ddd;
    }
}

/*css 버전*/
body{
	background-color: green;
}
body:hover{
	background-color: #fff;
}
body div{
	background-color: #ddd;
}
이렇게 SCSS와 CSS를 비교하면 다른 점이 생각보다 많이 없다.
여기서 핵심적으로 다른 부분은 바로 자식 블록을 부모 블록 밑에 중첩으로 쓸 수 있다는 점이다.
그리고 간단하게 변수처럼 바꿔서 쓸 수 있다는 것도 있다.
이렇게까지가 SCSS의 기초 문법이었고, styled-components에 대해서 설명하겠다.
styled-components는 SCSS와 관계가 있다!
왜냐하면, styled-components는 js에서 SCSS문법으로 사용할 수 있게 하기 때문이다.
먼저, styled-components를 사용하려면, 패키지로 다운로드해야한다.
yarn add styled-components
이 패키지를 적용하려면, import 해야한다.
맨 위에 올린 코드들 보면, 확실히 js파일에 SCSS 문법이 보인다.
import styled from 'styled-components';

const 태그처럼 사용할 변수이름 = styled.실제태그이름`
	속성들
`

//App.js의 일부분
const Container = styled.div`
  width: 100vw;
  margin: 0 auto;
  height: 80vh;
  border: 1px solid lightgray;
  border-top: none;
`;
const Button = styled.button`
  background-color: rgb(47, 110, 247);
  border: none;
  color: white;
  width: 150px;
  padding: 10px 20px;
  border-radius: 30px;
  margin: 0 1rem;
  z-index:1;
  &:active {
    background: rgb(47, 80, 247);
  }
`;
const ButtonContainer = styled.div`
  margin-top: 1rem;
  display: flex;
  justify-content: center;
`;
export default App;
3. 라이프 사이클
컴포넌트의 라이프 사이클이란 컴포넌트가
렌더링을 준비하는 순간부터, 페이지에서 사라질 때까지를 말한다.
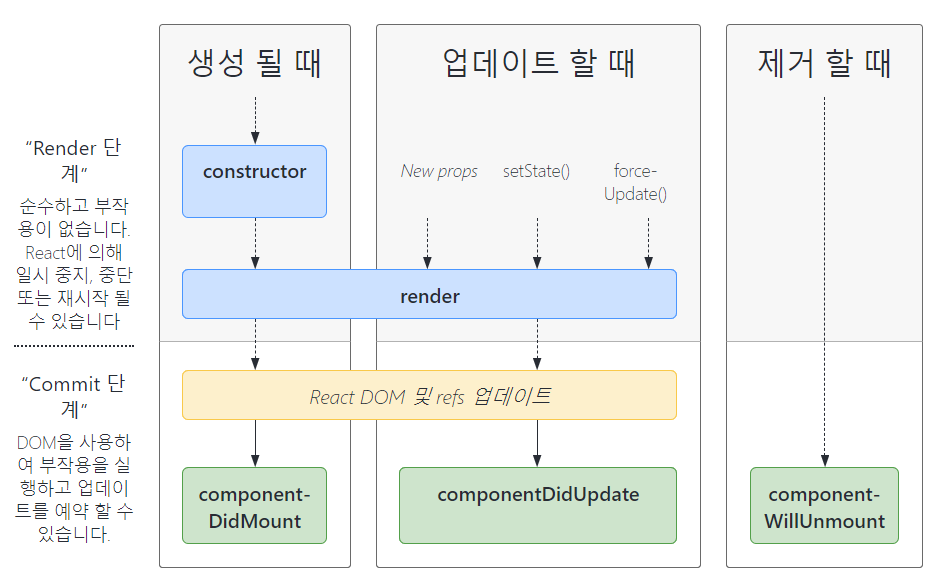
출처: React Lifecycle Methods digaram
https://projects.wojtekmaj.pl/react-lifecycle-methods-diagram/
React Lifecycle Methods diagram
Fully interactive and accessible React Lifecycle Methods diagram.
projects.wojtekmaj.pl
생성 될 때는 처음으로 컴포넌트를 불러오는 단계이다.
업데이트 할 때는 props가 바뀔 때, state가 바뀔 때, 부모 컴포넌트가 바뀔 때(리렌더링했을 때),
강제로 업데이트 했을 때(forceUpdate()를 이용하면 강제로 업데이트 가능)가 있다.
제거 될 때는 페이지를 이동하거나, 사용자의 행동으로 인해 컴포넌트가 화면에서 사라지는 경우가 있다.
처음에 컴포넌트를 생성할 때, constructor()가 먼저 실행된다.
그 후에는 render()가 실행되고, 여기까지의 단계는 Render 단계에 속한다.
Render 단계 다음 componentDidMount()가 실행된다.
componentDidMount()는 Commit 단계에 속하며, 첫번째 렌더링 때만 실행된다.
그리고 이미 마운트 된 것이므로 실제 돔에도 올라간 것이다.
componentDidUpdate(prevProps, prevState, snapshot)은 리렌더링을 완료한 후 실행되는 함수이다.
결국, 렌더링 됐을 때 compoentDidMount함수를 사용하고, 리렌더링 됐을 때는
이 함수를 사용한다. 이 함수도 Commit 단계에 속한다.
prevProps와 prevState는 이전 props와 state이며, 업데이트 되고 비교할 때 사용하면 좋다.
그리고 이 함수는 가상돔이 실제돔으로 올라간 후여서 DOM 관련 처리 가능하다.
componentWillUnmount()는 컴포넌트가 DOM에서 제거 될 때
실행하는 함수이며, 이 함수도 Commit 단계에 속한다.
주로 우리가 등록한 이벤트리스너들을 삭제할 때 사용한다.
컴포넌트의 라이프 사이클은 클래스형 컴포넌트에서 만 사용된다.
대신, 함수형 컴포넌트는 React Hook을 사용해서 라이프 사이클을 대체 가능하다!
useEffect() 함수 하나로 componentDidMount ,componentDidUpdate, componentDidUnmount를 해결 가능하다.
import React, { useEffect, useRef, useState } from "react";

const App = () => {
  const [count, setCount] = useState(0);
  const button = useRef(null);
  const text = useRef(null);
  useEffect(() => {
    console.log('componentDidMount');
  }, []);

  useEffect(() => {
    const handleButton = (e) =>{
      setCount(count+1);
      console.log('componentDidUpdate');
    }
    button.current.addEventListener('click', handleButton);
    //componentWillUnmount
    return () =>{
      button.current.removeEventListener('click', handleButton);
    }
  }, [count]);

  return (
    <div classNmae="App">
      <div>{count}</div>
      <button ref={button}>버튼</button>
    </div>
  );
};
export default App;
위 코드와 같이 useEffect() 함수 내에 두 번째 인수에 빈 배열과, state 값 변화가 없을 때
componentDidMount()처럼 실행된다.
그리고 useEffect()의 두 번째 인수는 state 값들 중 바꿀 값만 배열에 넣고, state 값 변화를 주는 코드만 작성하면,
componentDidUpdate()가 실행된다.
마지막으로, return ()=>{}는 componentWillUnmount()함수를 실행 할 수 있게한다.
그래서 주로 useEffect안에 함수들을 생성하고, addEventListener로 구독했다(componentDidUpdate)가
페이지 이동시에는 구독 취소(componentWillUnmount)하게 끔 코드를 쓴다.
4. 돔 요소 가져오기
React식으로 돔을 가져오려면, React.createRef()를 사용해야 한다.
어떤 형식으로 쓰는지 코드를 통해 보겠다.
만약, class 컴포넌트 형식이 아니고, function 컴포넌트 형식이라면,
React.useRef(null)를 사용하자. React.createRef()는 class 컴포넌트에서 사용한다고한다.
import React from 'react';

class App extends React.Component{
	constructor(props){
    	super(props);
        this.state = {

        };
        //createRef()선언하기
        this.text = React.createRef();
    }

    componentDidMount(){
    	console.log(this.text); //객체가 나온다
        console.log(this.text.current); //event.target을 한 것처럼 엘리먼트가 잡힌다.
        //<input type="text" />
    }

    render(){
    	return(
            <div className="App">
            	<div>돔을 한 번 잡아보자!</div>
            	<input type="text" ref={this.text}/>
            </div>
        );
    }

}
'개발 일기' 카테고리의 다른 글
| [개발 일기] 따라하며 배우는 노드, 리액트 시리즈 - 쇼핑몰 사이트 만들기 - 업로드 페이지 만들기 1 (0) | 2021.09.04 |
|---|---|
| [개발 일기] 프론트엔드의 꽃, 리액트 4주차 by 스파르타코딩클럽 (0) | 2021.08.10 |
| [개발 일기] 프론트엔드의 꽃, 리액트 1주차 by 스파르타코딩클럽 (0) | 2021.07.09 |
| [개발 일기] 왕초보 시작반 5주차 by 스파르타코딩클럽 (0) | 2021.07.03 |
| [개발 일기] 왕초보 시작반 4주차 by 스파르타코딩클럽 (0) | 2021.06.30 |