안녕하세요! 건브로입니다.
방학한 지 벌써 1달이 다돼가네요...
정말 시간이 빠르죠? 그래서 그런지 좀 급해집니다!
뭔가 이번 방학 때는 많은 걸 안 상태로 3학년이 되고 싶네요.
그래서 프런트엔드뿐만 아니라 백엔드도 같이 배우는 강의를 유튜브에서 찾다가
풀 스택 개발자이신 '나동빈'님의 강의를 보게 되었습니다.
아직 초반 부분이지만, 확실히 유용한 부분을 알려주시는 것 같아요. 😊
www.youtube.com/watch?v=_yEH9mczm3g&list=PLRx0vPvlEmdD1pSqKZiTihy5rplxecNpz
저는 이 강의를 보고 정리하는 것이 아닌 느낀 부분과 경험하는 부분을 초점 두겠습니다!
1. node.js, VScode 설치와 CRA 시작하기
gun-bro.tistory.com/2?category=911585
React setting
안녕하세요! 다음 블로그에서 티스토리로 넘어오고 처음 글 쓰네요! 그리고 한 동안 시험이 있어서 글을 못 올리고, 코딩도 못했네요... 이제 종강도 했으니 동기들과 공모전 준비하면서 React.js
gun-bro.tistory.com
LTS버전으로 node.js를 다운로드하고, cmd를 켜서 npm -v와 node -v를 눌러서 버전을 확인하면 된다.
node.js 부분은 나동빈님과 같게 했다. 하지만 CRA를 시작하는 부분은 나의 방식과 달랐다.
나동빈님은 cmd창에 npm install -g create-react-app을 사용한 후에 프로젝트를 만들 폴더로 이동했다.
그리고 create-react-app 폴더 이름(프로젝트 이름)을 사용했다.
위에 React setting 링크 들어가서 보면 알겠지만, 나동빈님의 방법보다는
npx create-react-app 폴더 이름으로 하는 게 나는 더 낫다고 생각한다.
나중을 위해서는 말이다!
2. 일반 CSS NO! Material UI Yes!
Material UI란 무엇일까?
Material UI는 React.js 기반 Ui 라이브러리이다.
Material-UI: A popular React UI framework
React components for faster and easier web development. Build your own design system, or start with Material Design.
material-ui.com
사실, 나는 Material UI를 이번에 처음 알게 되었다.
React.js를 입문하게 된 지 1달도 안됐기 때문이다.
Material UI는 Bootstrap과 비슷한 라이브러리이다.
React가 핫하긴 한 것 같다. React.js를 위한 CSS 라이브러리라니!
아직은 table 관련 CSS밖에 배우지 못했지만,
이 사이트에 들어가서 많이 찾아봐서 배워야겠다.
3.Material UI 적용
//App.js
import "./App.css";
import React from "react";
import Customer from "./components/Customer";
import Paper from "@material-ui/core/Paper";
import Table from "@material-ui/core/Table";
import TableHead from "@material-ui/core/TableHead";
import TableBody from "@material-ui/core/TableBody";
import TableRow from "@material-ui/core/TableRow";
import TableCell from "@material-ui/core/TableCell";
import { withStyles } from "@material-ui/core/styles";
const styles = (theme) => ({
root: {
width: "100%",
marginTop: theme.spacing(3),
overflowX: "auto",
},
table: {
minWidth: 1080,
},
});
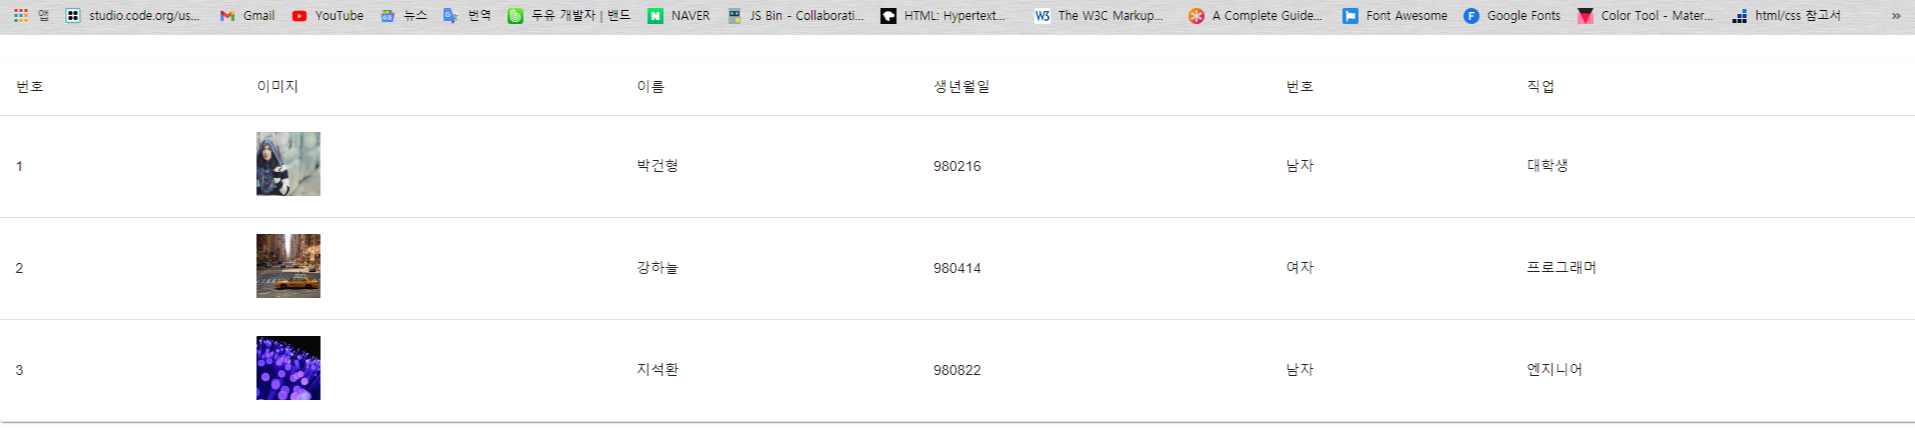
const customers = [
{
id: 1,
image: "https://placeimg.com/64/64/1",
name: "박건형",
birthday: "980216",
gender: "남자",
job: "대학생",
},
{
id: 2,
image: "https://placeimg.com/64/64/2",
name: "강하늘",
birthday: "980414",
gender: "여자",
job: "프로그래머",
},
{
id: 3,
image: "https://placeimg.com/64/64/3",
name: "지석환",
birthday: "980822",
gender: "남자",
job: "엔지니어",
},
];
class App extends React.Component {
render() {
const { classes } = this.props;
return (
<Paper className={classes.root}>
<Table className={classes.table}>
<TableHead>
<TableRow>
<TableCell>번호</TableCell>
<TableCell>이미지</TableCell>
<TableCell>이름</TableCell>
<TableCell>생년월일</TableCell>
<TableCell>번호</TableCell>
<TableCell>직업</TableCell>
</TableRow>
</TableHead>
<TableBody>
{customers.map((customer) => {
return (
<Customer
key={customer.id}
id={customer.id}
image={customer.image}
name={customer.name}
birthday={customer.birthday}
gender={customer.gender}
job={customer.job}
/>
);
})}
</TableBody>
</Table>
</Paper>
);
}
}
export default withStyles(styles)(App);
//Customer.js
import React from "react";
import TableRow from "@material-ui/core/TableRow";
import TableCell from "@material-ui/core/TableCell";
class Customer extends React.Component {
  render() {
    const { id, image, name, birthday, gender, job } = this.props;
    return (
      <TableRow>
        <TableCell>{id}</TableCell>
        <TableCell>
          <img src={image} alt="profile" />
        </TableCell>
        <TableCell>{name}</TableCell>
        <TableCell>{birthday}</TableCell>
        <TableCell>{gender}</TableCell>
        <TableCell>{job}</TableCell>
      </TableRow>
    );
  }
}

export default Customer;
오늘은 프런트엔드 쪽에 대해서 내용을 다뤘는데
다음엔 서버에 대해서 다룰게요!!
'개발 일기' 카테고리의 다른 글
| [개발 일기] 트위터 클론 코딩 #2 by 니꼬쌤 (0) | 2021.02.10 |
|---|---|
| [개발 일기] 트위터 클론 코딩 #1 by 니꼬쌤 (0) | 2021.02.08 |
| [개발 일기] React.js와 Node.js 이용하기 시작 #2 by 나동빈님(프론트엔드와 서버 폴더 세팅) (1) | 2021.01.18 |
| React class component와 function component 공부 일기 #2 (0) | 2020.12.26 |
| React class component와 function component 공부 일기 #1 (0) | 2020.12.25 |